Carl Stalhood

Wednesday 27 July 2016

Web Interface vs StoreFront logon process

The user logon workflow (logon process) in StoreFront is different to Web Interface. The detailed description of the logon process is shown in Table 1.

Figure 1
StepWeb InterfaceStoreFront
1User enters username and password. 
This is sent to the Web Interface server.
User enters username and password.
 This is sent to the StoreFront server.
2The authentication service of StoreFront fetches the 
user credentials and validates them with a domain 
controller. StoreFront servers must reside either within
 the Active Directory domain containing the user accounts 
or within a domain that has a trust relationship with the
 user accounts domain. All the StoreFront servers in a group
 must reside within the same domain.
3StoreFront checks the data store for existing user subscriptions and stores them in memory.
4Web Interface forwards the user credentials as part of a XML 
query to XenApp or XenDesktop sequentially. In this case, the 
credentials are sent to the XenDesktop Controller which is the sole resource configured.
StoreFront forwards the user credentials as par
t of a XML 
query to the backend systems, such as XenApp, 
XenDesktop, App Controller or VDI-in-a-Box sequentially. In this case the credentials are 
sent to the XenDesktop Controller which is the sole resource configured.
5The XenDesktop Controller validates the user credentials with a domain controller.
6After a successful validation the XenDesktop Controller checks which resources have been published to 
this user within its database.
7The XenDesktop Controller sends an XML response to Web Interface / StoreFront which contains all resource
 available for the user from the XenDesktop site.
8Web Interface displays the available resources.StoreFront sends the list of available resources 
including the existing subscriptions to the Citrix
 Receiver installed locally or displays them in 
Receiver for Web.
9Now the user can start a resource.

prohibit logons xenapp 6.5

The purpose of this article is to summarize the different ways an administrator can use to take a XenApp server offline for maintenance.

Drain-mode maintenace

TS Server Drain Mode was introduced in Windows Server 2008 and when the server is switched to Drain Mode, it does not accept any new connections but it will allow currently logged on users to reconnect to their existing sessions.  By waiting for existing users to save their work and log off, the administrator can take a terminal server down for maintenance without causing user data loss. Drain mode also allows server admins to connect to the console session – using “mstsc /admin”.
Administrators responsible for enterprise environments that is shared by multiple users will find the functionality of drain mode maitenance as very important feature. The most common scenario when drain mode maitenance can be used is when a single server is hosting applications for multiple users. Using this feature administrator can leave existing sessions active, including the ability to reconnection to disconnected sessions but block or redirect all new incoming requests to another servers hosting the same resources. Once all existing sessions are closed administrator can start maitenance tasks.

XenApp maintenance methods

Server administrators can put XenApp server in maintenance mode using:

Windows Remote Desktop Services options

Server administrator can manage incomming sessions using change logon command. This method can be used only when server is online. Logon mode for RDP is per-server configuration that is stored in registry in two different locations:
HKEY_LOCAL_MACHINE\SYSTEM\CurrentControlSet\Control\Terminal Server\TSServerDrainMode
0 = Allow all connections
1 = Allow reconnections, but prevent new logon until reboot
2 = Allow reconnections, but prevent new logon
HKEY_LOCAL_MACHINE\SOFTWARE\Microsoft\Windows NT\CurrentVersion\Winlogon\WinStationsDisabled
0 = Enabled
1 = Disabled
Available change logon switches are the following:

XenApp  Logon control options 

Citrix strongly recommends that you use these method  instead of the Windows Remote Desktop Services options to control logons to XenApp servers.
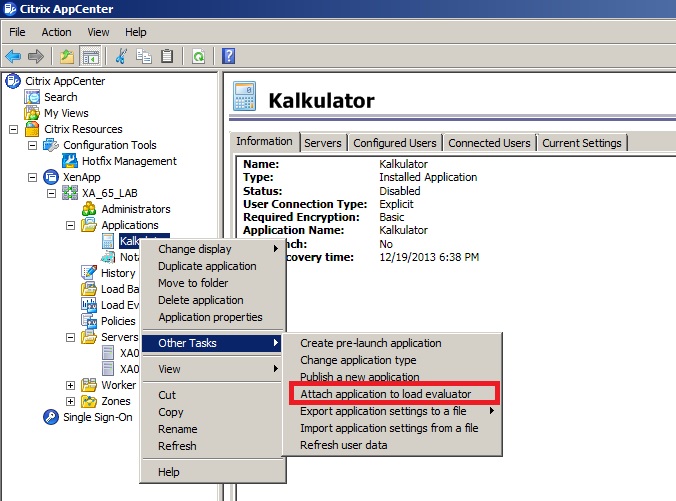
Prior to version XenApp 6.5 the most common method was to use  Custom Load Evaluator that will report a full load when assigned to a server. The main reasons to use Load Evaluator were:
  1. Load Evaluator assigment is stored in data store, so Load Evaluator can be assigned to a server, even while server is offline.
  2. Load Evaluator will reject new sessions, but it will allow user to reconect to disconnected session
  3. Load Evaluator will affect only ICA sessions and RDP connection will still be allowed
In XenApp version 6.5 ability to directly assign Load Evaluator to specific servers was removed, instead Load Evaluator can be assigned to the Worker Group (Worker Groups are collections of XenApp servers, residing in the same farm, that are managed as a single unit). The ability to put a single server into maitenance mode is provided by logon mode control.
By default, logons are enabled for each server in a farm, allowing connections, reconnections, and session sharing. Before taking a server offline, such as for maintenance, use these options to reroute logons to other servers.
  •  Allow logons and reconnections. Enable all logons, reconnections, and session sharing (default setting).
  • Prohibit logons and reconnections. Reroute all logons, reconnections, and session sharing to other servers.
  • Prohibit logons only. Reroute new connections and session sharing, but allowing users to reconnect to disconnected sessions. This state persists until you change it manually.
  • Prohibit logons until server restart. Reroute new connections and session sharing, as above, but after restarting the server, the setting automatically changes back to Allow logons and reconnections.

XenApp logon control is actually managed through data store and is updated on target host using LHC synchronization (Local Host Cache). When system administrator change the logon mode in console, this change is actually not immediately done in the registry of the target machine. Behavior will be different based on the server status:
  • XenApp server is online – server will get notification using the normal LHC synchronization interval.
  • XenApp server is offline – server will get notification from data store during boot and automatically apply the logon mode that was configured in the console. This allow to change logon mode, even while server is offline.

Powershell scripts

Administrators responsible for large and dynamic enterprise environments, will look for methods to automate the XenApp server maintenance process. To fully manage and automate assignment of logon modes, there are two commands that can be used:
To get logon mode assigned to server, it’s one of the properties of the regular server object:
$(Get-XAServer -ServerName $Server).LogonMode
To assign logon mode to server:
Set-XAServerLogOnMode -LogOnMode $LogonMode -ServerName $Server
Values allowed for $LogonMode are the following:
  • AllowLogOns
  • ProhibitNewLogOnsUntilRestart
  • ProhibitNewLogOns
  • ProhibitLogOns

Summary

Important items to remamber:
  • In XenApp versions prior to 6.5 usage of custom load evaluator was just a workaround to provide required functionality. Logon mode functionality availabe in version 6.5 is a wining option and there is no reason to use the old approach.
  • System administrators still have RDP access to disabled servers to perform administrative tasks using mstsc /admin command.
  • Since logon mode is managed through data store, it is possible to drain server, even while server is offline.

All about Xenapp Load evaluator

Load Evaluator Summary
A fresh XenApp 6.5  installation comes with 2 preconfigured  load evaluators supplied by Citrix:
  • Default – XenApp assigns the Default load evaluator to each server after you add your license to the server farm. It contains two rules:
    • Server User, which reports a full load when 100 users log on to the attached server
    • Load Throttling, which specifies the impact that logging on has on load and limits the number of concurrent connection attempts the server is expected to handle.
  • Advanced – This load evaluator contains four rules
    • CPU Utilization Load
    • Memory Usage
    • Page Swaps
    • Load Throttling
Both built-in evaluators have some downsides and often a new custom load evaluator is created. I would say more – if IT department in the organization actively monitor existing XenApp environment, a customized advanced load evaluators are the must.
Working with Load Evaluators
To access the load evaluators in XenApp, you select the Load Evaluators node in the left pane of the AppCenter. The following tabs are displayed:

  • Load Evaluators displays all the load evaluators created for the farm in a list. Beneath this list, the Current Settings tab displays at-a-glance the state of all the available load evaluator rules.
  • Usage by Application displays the load evaluators that are attached to the farm’s published applications.
  • Usage by Server displays the load evaluators that are attached to each server in the farm.
When using load evaluators, keep in mind the following:
  • You cannot modify or delete any of the built-in evaluators.
  • Each server or application participating in load management can have only one load evaluator assigned.
  • Load evaluator is assigned to servers via Group Policy.
  • To assign load evaluator to individual applications on the server follow the manual process:
 Custom Load Evaluator
As it was mentioned above builin-in evaluators have some downsides and in most cases load evaluator with custom rules is required. Every environment, application and every workload is different, so whichever load evaluator is implemented may vary, but they should be customized and monitored. To efectivly monitor your environment you have to create custom load evaluator. Based on my experience the best is the combination of the rules User Load, Memory Usage, CPU Utilization and Load Throttling – the same set of rules as advanced load evaluator but the values for each rule should be determined by performance tests. Because CPU Utilization and Memory Usage have a dynamic character and may be specific to installed/used application those rules will be used when the utilization is pretty high. See the example of custom load evaluator below.


How to…apply Load Evaluator with Citrix XenApp 6.5


One of the significant improvements when migrating for XenApp 5.0 to XenApp 6.5 is the retirement of the old Advanced Settings console.
Now at last there is one console for all XenApp configuration.
It turns out creating and editing Load Evaluators is straight forward enough, but applying them is quite different. You can no longer simply apply the appropriate Load Evaluator to the server as before, now they are applied via Citrix policy.
Therefore you need to create a new Computer Policy and edit the Server Settings to select the Load Evaluator Name.
I’d recommend filtering the policy by Worker Groups, not servers. That way instead of managing individual servers all you need to do is add or remove the server from the Worker Group.
1. Create the new policy

2. Edit the Load Evaluator setting and select the appropriate LE

3. Filter as appropriate to apply to set server(s)


To assign a load evaluator to a server
  1. Create a new Computer policy or select an existing Computer policy you want to modify. Depending on the console you use to manage Citrix policies:
    • From the AppCenter, select the Policies node and then select the Computer tab.
    • From the Group Policy Management Editor, select Computer Configuration > Policies > Citrix Policies.
  2. From the settings list, locate the Load evaluator name policy setting and click Add.
  3. Select a load evaluator from the drop-down list and then click OK.
  4. Add the Worker Group filter to the policy and specify the worker group containing the servers to which you want to assign the load evaluator.
To assign a load evaluator to a published application
  1. From the AppCenter, select the Applications node in the left pane.
  2. Select the published application to which you want to attach a load evaluator.
  3. From the Actions pane, select Other Tasks > Attach application to load evaluator.
  4. On the Assign Load Evaluator dialog box, select the load evaluator to attach.
XenApp 6.5 load values explained
The load evaluator is a thread in the IMA Service on a XenApp Server that calculates the load index for that server. The load index is an integer value from 0  to 10,000 that represents how busy is XenApp server. A value of zero represents no load, while a value of  10,000 indicates the particular server is fully loaded and is not accepting any new connections.
To dispaly the current load on the server, administrator can run the command qfarm /load or query farm /load. Load vaules as reported by qfarm utility:
0 to 9998   This is the normal range for Load Manager.
99999          No load evaluator is configured.
10000        Load is at 100 percent (full load).
20000       The AppCenter console contains an incorrect server edition or a license mismatch.
99990        Results when a custom administrator with restricted rights runs the following QFARM commands:
  • QFARM SERVER /APP
  • QFARM /APP
  • QFARM /APP <appname> The QFARM command may not return any results when a custom administrator runs the following queries: QFARM /DISC
  • QFARM /LOAD
  • QFARM /ZONELOAD
How the server load is calculated  ?
The current load is a result of the calculations and sum of the values of all the rules in each and every load evaluator which applies to the server. The base algorithm for establishing actual load is: Highest_Load + (Average_Other_Loads * .1)
One important factor to understand is once any single rule reaches its maximum value, the load value for that server becomes 10,000, effectively removing the individual server from contention for new sessions. Individual servers continuously update the respective zone data collector with their current score every 15 seconds under normal conditions, or after each and every logon or logoff of a user session.


Sunday 24 July 2016

PowerShell Xenapp 6.0 & 6.5 Application Report

https://youtu.be/XSFJ0xx7ztY

PowerShell Xenapp 6.0 & 6.5 Application Report

Add-PSSnapin Citrix*

Get-XAApplicationReport * | select DisplayName, FolderPath, ApplicationType, Enabled, CommandLineExecutable, ClientFolder, @{n="Servers";e={[string]::join(" ; ", $_.ServerNames)}}, @{n="WorkerGroups";e={[string]::join(" ; ", $_.WorkerGroupNames)}}, @{n="Users";e={[string]::join(" ; ", $_.Accounts)}} | Export-Csv -NoTypeInformation -Force C:\temp\XAReport.csv


Get-XAWorkerGroup | Select WorkerGroupname, @{n="Servers";e={[string]::join(" ; ", $_.ServerNames)}} | export-csv -NoTypeInformation -force c:\temp\WG.csv